If you have gone through the hassle of removing old wallpaper from your home or office walls, you’ve likely had a specific redesign project in mind. Maybe you’re wanting to install new wallpaper, paint over the wallpaper adhesive, or install wood panelling to add a bit of texture to your space. Whatever your interior design project is, you will need to prepare your walls after the wallpaper has been removed.
Most “Do-It-Yourself” fanatics, contractors and other home renovators often want to speed up the process of their interior design project. This can result in them not preparing their walls after removing wallpaper. While this may save them time, it could risk the final result of their project.
It is important to prepare a wall after wallpaper removal for a variety of reasons. When wallpaper is removed, it could scrape and damage the wall surface. Similarly, any leftover wallpaper glue (also called adhesive) can make painting difficult because it could reactivate when it comes into contact with paint, creating a sticky mess on your walls.
Rather than risking your project, it is best to devote some time to preparing and finishing your walls after you have removed old wallpaper. Follow these steps and tips to prep your walls for painting, new wallpaper installation, or another interior design project.
Skim coating is the act of applying a thin layer of drywall plaster or joint compound to walls that once had wallpaper. When stubborn wallpaper is removed, it can sometimes leave behind wallpaper glue or damage the surface of the walls. By applying a skim coat of drywall mud, you can create a smooth surface or repair the walls for your next project.
Much like other home renovation projects, the first step should be to prepare the room for the work that is going to be done. This can involve moving or covering furniture out with a plastic sheet, laying a drop cloth over floors, and taping baseboards and crown moulding to protect them against any spray or spillage that could occur.
This can be a tedious step but is important nonetheless. The products and tools used throughout this project could permanently stain furniture, outlet covers or other finishes, so make sure that everything in the room is covered or moved to another area of your house if possible.
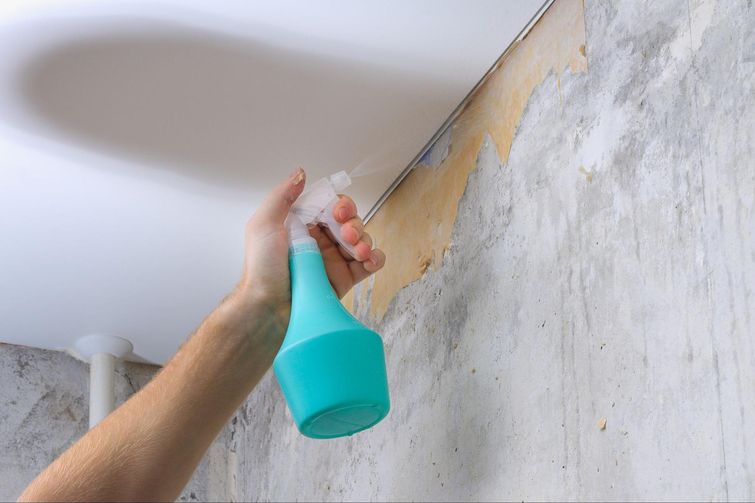
After removing wallpaper, you may notice that there is some remaining glue left on the surface of your walls. While this can be easily covered up with joint compound, the water in your skim coat may reactivate a water-based adhesive and form a mess on your walls. Thankfully, there are many tips on how you can remove wallpaper glue.
In order to remove any remaining residue, create a mixture of warm water, fabric softener and vinegar in a pump sprayer, spray bottle or bucket. Either spray or use a sponge to cover the surface of an entire wall with the solution. When the solution is applied, it will soften wallpaper adhesive and help dissolve it quickly.
While letting the wall completely dry, it is time to prepare the drywall joint compound for the skim coat. Fill a pan or dish with a bit of the joint compound, then add a small amount of clean water. The texture needed to perfectly smooth the walls will be around the thickness of a thin pancake mix. Keep adding water to the mixture until you have the desired consistency.
Once the old wallpaper adhesive has been removed and the wall is completely dry, it is time to begin applying the plaster.
The first step is to fill a putty knife with a small amount of the joint compound. Be careful not to use too much as it could be difficult to smooth out before it dries. We also recommend that you wear gloves while applying your skim coat as it can stick and dry on you.
Apply the compound to one side of the knife, then hold the loaded side at a 25-degree angle to the wall. Scrape the knife in a vertical direction along the wall to smooth out the compound and cover the surface with it. Follow each vertical stroke with a horizontal one to evenly smooth out the mud. If you are not sure about how to do this, try to mimic the posture you would take on while painting, except do not move the brush up and down - only move it in one direction per stroke.
After completion, let the walls dry thoroughly before moving on to the next step. This may take several hours or even a day.
Apex's expert tips: Those who are only fixing small areas of their house can switch plates and place a small amount of joint compound onto a mud plate or paint palette. A plate can be held easily as you patch the walls with the mud, reducing the time and amount of bending or twisting needed.
The next step is to sand down the wall. Often, wall texture will change and become uneven and rough throughout this process. Unless you like the appearance of textured walls, this may interrupt your interior design plans. Sanding will help improve the room's appearance and keep walls smooth and even for your next project.
Use a 220-grit piece of sandpaper to lightly sand the wall. Apply even pressure to ensure that the wall is not left uneven in spots. Also spend extra time sanding areas that had a cut, tear or scrape in the underlying drywall paper because these blemishes could stand out when painted over.
Make sure to wear a mask and eye protection while sanding as extra dust and debris could enter your lungs or eyes.
One of the best tips shared by wallpaper experts is to use an oil-based primer on a wall that once had wallpaper. Oil-based is the best primer for the job because it helps seal in any wallpaper glue and provides a great finish to the surface. Even if you are not planning on painting, using a paint primer can mask any wallpaper residue that may hinder the appearance of your walls.
Apply primer just as you would if you were painting; use a paint roller and tray to apply several coats of primer on the wall while letting each coat dry completely before applying the next. If any primer happens to drip on an uncovered surface, immediately use a wet sponge to remove it.
After you have taken the time to remove wallpaper, apply a skim coat, sand and apply primer to the wall, it is time to begin your next project! Whether you are installing new wallpaper or painting, your space will be ready for the next steps.
If you are looking to paint walls that once had wallpaper, it is important to use oil-based paint. As previously mentioned, most wallpaper glue is water-based. Even after it has been mostly removed and sealed, it can still permeate the joint compound and rise to the surface of your wall.
Oil-based paint will help seal in the adhesive and reduce the risk of it interfering with your paint job. While painting, apply several coats to your wall to reduce the risks of white flecks of glue being seen through the paint. Make sure to let each coat dry thoroughly before another coat of paint is added.
Preparing a room that was once covered in wallpaper or other wallcoverings is a time-consuming task. Many people simply don't have the time, tools or experience to follow these tips and complete the job themselves. Professional wallpaper installation and removal companies can help. Apex is a trusted Toronto wallpaper company with over 20 years of experience installing and removing wallpaper.